Photoshop blending modes tutorial
Here are some basics about layer blending modes in Photoshop (I used PS6). As a sample for this small tutorial I used a part of a photo, found somewhere on the net... First of all, you'll need two layers. I have created a simple background for this aim. You could do the same or use a picture. But remember that in some cases you will not get a good result, by using a solid background picture or foreground layer. So using two photos at the beginning could be a good idea. Let's see on the way these two layers interact in different blending modes.
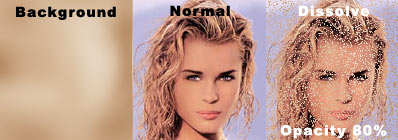
The picture above demonstrates you a background, a foreground picture I used and two results of their interaction. In the first case (middle picture) you see no background through the picture of a girl, as there was only the photo. It is the Normal mode, the most commonly used one. In this mode the two pictures interact in no way. You may change the transparency of the foreground to see a background, but in our case the girl picture's opacity is set to 100% (no transparency). A picture on the right demonstrates you the Dissolve mode with opacity set to 80%. In this mode a foreground consists of pixels of two kind: with transparency equal to zero or 100%. The number of pixels of each kind depends on the opacity value of the foreground.
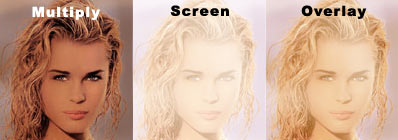
The Multiply mode will "strengthen" your picture. As you have already understood, it makes a multiplication of each pixel of the interacting layers. So it's quite useless to use this mode on an image which has too many "pure" colors, like white (#FFFFFF), red (#FF0000) and so on... This mode is used to make various special effects. For example in Poetess’ "I can't draw" tutorial it allows you to create photorealistic blood. Screen mode multiplies the inverse of the blend and base colors. The result is always lighter (unlike the Multiply mode, which always gives a darker image), so you could use it for various highlight effects. Overlay mode adjusts the brightness and contrast of the image, depending on the interacting pictures. It works as a combination of Mutiply/Screen modes. You should play a bit yourself with this mode to understand "how it works".
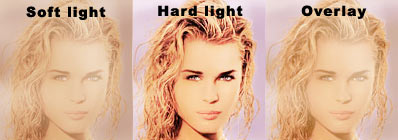
The Soft light mode underlines the lightness and the contrast of the picture, as if you use a burn/dodge tool: it makes dark regions darker and bright ones brighter. As you may see in the shot above, the regions, where both the background and foreground pictures are dark, the result is "burnt", and where light - "dodged". In our case it gives quite a similar result with the Overlay mode. Unlike it, Hard light mode adjusts bright and dark areas, as a multiplication/screening.

The Color Dodge and Color Burn modes give a serult, which is quite similar with using Burn/dodge tools (a picture on the left): underlines the image's dark or light regions. But again, a result depends on the blending images.
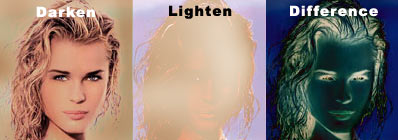
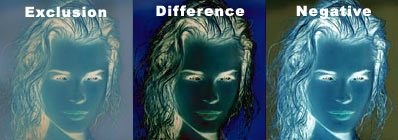
The Lighten mode looks for the information about the color in each channel and selects the lightest of the blending colors. Colors that are darker are changed and the brighter ones are left unchanged. Darken, unlike it, selects the darkest color. Difference mode makes a substraction from the brightest (of background and foreground) color.

The Exclusion mode gives a result close to the one obtained by a Difference mode, but it is less contrast. As out background image is quite bright (closer to white (#FFFFFF), than to black (#000000)), the final picture is looking close to a simple, negative effect.
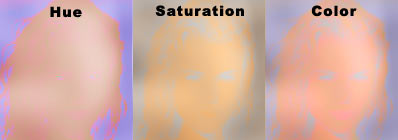
The Hue, Saturation and Color modes make an image with the Hue, Saturation or Color (depending on the mode) of the blend color and two other parameters from the base color.
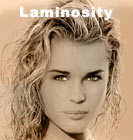
The Luminosity mode gives a result opposite to the Color mode: the brightness is taken from the blend color and hue and saturation – from the base color. As you might have guessed, this mode is great for getting various special effects, ecpecially stylising. I used it in some of my wallpapers to make the color photos look like duotones, depending on the background…
Taras Brizitsky [AKA SacRat]
http://sacrat.deviantart.com
P.S.: Great thanks to Dan Caylor (dan@thinkdan.com) for his photoshop tutorial about layers, as it had helped me to make my works in Photoshop more effectively. Other greets and respects go to the following deviantart members: cLUTz, Gileva (Imagine), Iliks, Jark, Olya, Poetess, Tanya, The-Joker and all those, who commented my works and added them to their favs; to all the tutorial writers (I don't even know, what I could do without all those tutorials I have now); all my pen-pals: FS, Tania, Alina, Yanet, Betty CCH, Wendy, Chinita and all I've forgotten to mention; as always, a great thank to Fiorela Agusti..